Smartcat Studios
  • Home
    • Social Media
  • Patterns
  • Support
    • Skill Levels
    • Video Tutorials >
      • Knitting Videos
      • Crochet Videos
      • Other Videos
    • Errata
  • Services
    • Commissions
    • Teaching Classes
  • Contact
    • Contact
    • Feedback
  • About
    • Testimonials

Technique of the Week: Foundation SC Cast On

6/26/2015

0 Comments

 
I don't know about all of you, but I find that it is sometimes really difficult to get a chain cast on that is loose enough to crochet into, without being so loose that it puckers or hangs along the beginning edge. If you have the problem of it puckering, you can disguise it by working over the remaining loops of the chain with single crochets after you are finished with the project, but it is so much nicer to just have a really nice beginning edge that looks nice from the beginning.

I discovered the Foundation Single and Double Crochet Cast Ons quite a while ago and use them whenever possible. They can be substituted whenever the first row of your pattern is a single or double crochet row. Sometimes even when the first row is a pattern row, you can start with the Foundation Single Crochet Cast On and have a slightly bigger/bulkier beginning, which will not look out of place. It is a judgement call as to deciding when to exchange beginning cast ons, but once you try it, I think you will agree that it leaves you with the perfect start to a wide variety of projects. 

To start the cast on, you will chain 2 stitches for the single crochet or 3 stitches for the double crochet. Insert your hook into the 2nd/3rd chain from the hook (yarn over the hook first if doing the double crochet) and pull up a loop. Chain 1 stitch, then complete the single or double crochet as you normally would. For the next and all remaining stitches, insert the hook into the chain stitch (yarning over first if doing the double crochet), pull up a loop, chain 1, then complete the stitch. When inserting the hook into the chain stitch, I prefer to go through the hump of the chain, leaving the top two loops to face the bottom edge (creating a nice chain stitch edge, which will match your last row in a lot of cases). Be sure to only work the base number of stitches that you need, ignoring any turning chains, before you start on Row 2 of your pattern. 

This technique can also be used when beginning an in-the-round project, like a bag, pouch, basket, hat, etc. You will slip stitch to join with the first stitch, then continue on with Round 2 of your pattern. You will notice that this join leaves a gap at the very edge of your project, but this can be solved by using the tail to sew the gap closed. Cast on a new project today and try out this fun and useful technique.

A video of the Foundation Double Crochet Cast On can be seen here.
0 Comments

Perfect Baby Sweater for Summer

6/25/2015

1 Comment

 
Picture
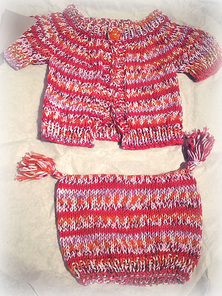
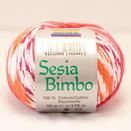
I love to knit and crochet baby sweaters, hats, booties and everything else that make perfect baby shower or new baby gifts. They are so quick to make and always turn out so cute. I usually try to make at least two pieces that coordinate and so when a friend asked if I could make a cute sweater for her new goddaughter, I agreed and dug into my stash for just the right yarn. I settled on Sesia Bimbo. This is a yarn from Italy that is 100% cotton in a fingering weight. It comes in some fun prints that stripe into almost a fair-isle pattern. It was the perfect yarn for the job and I loved working with it. It flowed smoothly on my needles, had no extra joins, did not split and washed up into a cuddly, soft texture.

Picture
The pattern I chose was Marianna Mel's Short-Sleeved Perfect Boy or Girl Top Down Jacket. I had knit this pattern before as a shop sample for Quintessential Knits and loved how quick this project was to make. I believe it took me about two - three days of casual knitting to complete and was fairly simple to make. I originally had a few issues keeping track of where I was on each row, since the number of stitches worked between increases is repeated multiple times on each row, however as soon as I started using markers to mark the increases (one before the first increase and one after the second increase of each section), the sweater just flew off the needles. It is worked from the neckline down with a round yoke, adding the button band as you go. The sweater is seamless construction with you placing the sleeve stitches on waste yarn while you finish the sweater and then picking them back up to knit the sleeves in the round. The sweater is also very versatile to a variety of yarn weights and so you could easily increase the size of the sweater by working it with larger yarn and needles. As I had a bit of yarn left after completing the sweater, I cast on some stitches and made the cute tassel cornered hat to go with it. The yardage in one skein was the perfect amount to complete the sweater and the hat with the tassels.

My friend loved the finished results and couldn't wait to see her goddaughter in it. I wish them both a lot of joy and happiness in the sun.

1 Comment

Seashore Kerchief

6/23/2015

0 Comments

 
Picture

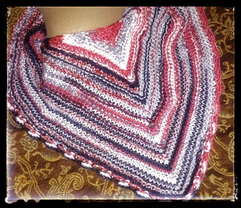
To experiment with this yarn, I decided to work the Seashore Kerchief pattern by Churchmouse Yarns. It had been in my Ravelry queue for awhile, waiting for just the right yarn to appear. I decided to take a chance with the Kimera yarn and see what happened and OH do I LOVE the results. Kimera was an absolute delight to work with. There were no issues with knots, splitting or tangles in the ball. The Seashore Kerchief pattern was very quick, I think I completed it in a single day. It was well written and very easy to understand and work. I am delighted with how the kerchief turned out, my only criticism would be that I would have preferred it to be a little larger, as there was not enough of a tail for it to be tied or wrapped around my neck. If I make another one, I will either cast on extra stitches or knit on larger needles with larger yarn. (NOTE: I did not check my gauge, so it is possible that my gauge was off, which is what resulted in the smaller size.) What I ended up doing is just sewing the ends together, as I wove in my ends. It is loose enough to slip over my head, so it works perfectly. I love the decorative cast on edge and the kitchener BO at the neckline was a unique finish. I had not previously worked a shawl in this manner and as a designer I am always interested in new techniques for finishing or starting projects.


Definitely a pattern I will work again or will use as a template with a new pattern stitch.

Picture
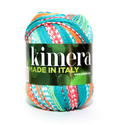
A few months ago, I entered a contest on Facebook that was hosted by Jimmy Beans Wool. They were promoting their Beans for Brains scholarship, so for each share on Facebook and Twitter, you received an entry into the contest. I won one of the prizes and received a box full of yarn in the mail. One of the types of yarn in the box was Adriafil Kimera. This is a 100% Egyptian mercerized cotton, DK weight yarn in a variety of fun variegated prints. The balls of yarn look very unusual with their speckled sections of color, but oh did it knit up in a wonderful way.

0 Comments

Dangling Conversation Shawl

6/20/2015

0 Comments

 
Picture
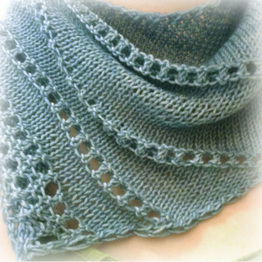
Last week I had the opportunity to work up the Dangling Conversation by Mindy Ross. This pattern is a delightful, asymmetrical shawl that is worked end to end. You cast on just a few stitches, work until it is as large as you wish or have yarn for and then bind off. The shawl has optional bead instructions and is a simple stockinette pattern with eyelet rows at decreasing intervals, perfect for watching TV or those times where you don't want to have to concentrate heavily on the pattern. It was a fairly well written pattern and was very easy to follow. The pattern includes both written and chart instructions and therefore will appeal to a wide variety of knitters.

I worked this pattern with a new, to me, yarn by Cedar House Yarns, Sapling Sock in a gorgeous light blue color. The yarn was an absolute delight to work with. I had no issues with it splitting on me and there were no irregularity in the hank of yarn that I worked with. It washed up well, with just a little bit of dye bleeding out into the water (hardly noticeable). The shawl blocked out well, is super soft and drapes well.

I made a few adjustments to the pattern, as I really like having a slip stitch selvage stitch on the edges of my shawls whenever possible. You can find the exact adjustments on my project page at Ravelry. If you would like to see the finished shawl, it will be on display as a shop sample at Quintessential Knits in Duvall, WA.

0 Comments

RainCity Fiber Arts Mitts

12/31/2014

0 Comments

 
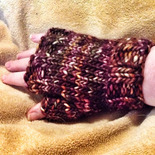
    I am often my own worst enemy, procrastinating projects that I'm not confident about. In August, RainCity Fiber Arts asked if I would design a pair of fingerless mitts for her Pilchuk Chunky yarn. She wasn't in a rush, so I did not make a priority of the project. Other projects have come and gone and the yarn still sat on my shelf, patiently awaiting my attention. Yesterday, I had a horrific headache and wasn't up to doing much more than laying in bed, watching Netflix, so I decided I would be a bit productive. The challenge was to use as much of the 82 yd hank as possible, without going over. Success! Using my scale to check my remaining yarn at key points of the first mitt, I successfully completed it with just a hair less than 1/2 of the yarn used. I cast on and worked the second mitt and found I ended with approximately 3.5 yards remaining. PERFECT! I will be writing the pattern up (officially today), then just need to get some great photos. The pattern will be available from RainCity Fiber Arts and perhaps on my Ravelry store as well. We haven't hashed out all of the selling details yet.


Picture
Pilchuk Mitts
Yarn: RainCity Fiber Arts Pilchuk Chunky (82 yds/100 g)
Needles: S-M 10.5 (6.5 mm); M-L 11 (8.0 mm)

Short-cuff fingerless mitts with thumb gusset.

0 Comments

Birds of a Feather

12/23/2014

0 Comments

 
Picture
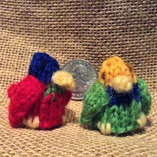
Under the influence of my youngest child, Saphushia, I decided to work on the parrots. I picked a few of the brightest colors in my available palette and started. The original shape before adding the wings, tail and beak, looked like a strangely colored piece of candy corn, according to Saphushia, and I must agree that she was correct. Once I added the extras though, it is amazing what a difference it made. Below are the changes I made to the pattern.

Parrots (page 70)
from Mini Knitted Safari
Finished Size: approximately 1.5"

Small amounts of Wool of the Andes Worsted in Caution Yellow, Red, Peapod Green, and Winter Night Blue. Beaks and feet were worked in Creme Brulee Yellow. The eyes on the green parrot are stitched with Brown Sugar Brown and on the red parrot are Coal Black (though I think I will rework them in a dark gray so they stand out against the blue better. 

The pattern is worked as written, with the following exceptions. 
Wings: Work Row 4 decrease as k2tog, ssk. Then work Row 6 decrease the same.

I needle felted all of the appendages onto the parrots, rather than sewing, and the eyes were worked as back stitches, shortened by needle felting.

0 Comments

Starting Noah's Ark

12/17/2014

1 Comment

 
Noah's Knits
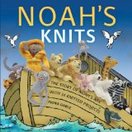
For several years now, I have had Fiona Goble's Noah's Knits book in my Kindle library, thinking of some time in the future when I would take on this fun project. I knew that it would be an enormous undertaking (and expensive), but I love doing these fiddly little knits (and crochets) from time to time and putting my own stamp on them. Recently I was given a gift certificate, which allowed me to purchase the majority of the yarn to get me started (30 different colors) for a little amount of money out of pocket. I chose 100% wool, as I knew I would want to be able to needle felt details (fur textures & colors) onto the animals as I created them. The patterns specify a DK weight yarn, but I decided to use Knit Picks Wool of the Andes in Worsted (actually I ordered before I looked at what was recommended, serious breach of protocol there), accepting that I would have issues with gauge and size.

Mini Knitted Safari
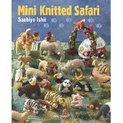
Then a few days ago, while browsing Pinterest, I ran across some amazing knitted creatures by Sachiyo Ishii. After a bit of work tracking her down I found that she has a few books published, including Mini Knitted Safari. This book intrigued me, as there were so many different animals from what was included in the Noah's Knits book, so I just had to purchase it. Using this book as well adds 27 animals (some are repeated) to the original 14 in Noah's Knits, plus Noah and his wife.

I decided to start this project earlier this week, as I am sort of between projects and these animals have been calling my name for so long. After browsing through Noah's Knits, I decided to try a goat. I also thought I would try it in the round (all of the animals in both books are worked flat and seamed together. I was using a size 6 (4.0 mm) needle and everything went well until I was supposed to cast on additional stitches for the neck. I went through the entire process of sewing up the pieces that needed it, but it was very quickly apparent, how the wrong gauge can throw your entire project off. My semi-finished piece looked like a cross between a goat and a giraffe, plus the size of the ark needed to house animals knit in this gauge would have also needed to be very large (considering the number of animals I wanted to make that are so much larger than a goat), so I frogged the whole thing. The next day, Mini Knitted Safari arrived and I discovered that all of those patterns required DK weight yarn as well. Since I had already invested so much money into the worsted weight yarn, I decided to try an excessively tight gauge on size 2 1/2 (3.0 mm) needles. I also changed projects and cast on for the brown bear from Mini Knitted Safari.

Brown Bear

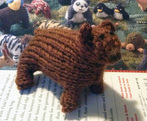
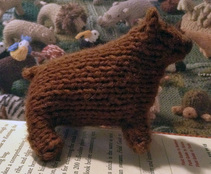
As it only vaguely resembled a bear once it was sewn up, I despaired that this project would never get off the ground, but with some judicious stuffing and resewing of seams to adjust the outline, plus extensive use of my felting needle, it now resembles a brown bear and meets my "cuteness standards". With my tighter gauge it measures approximately 3" long x 2 1/2" tall. Still a little big, but definitely more appropriate than my much larger goat. I will detail the construction of this cute creature as well as the changes I made to the pattern, below.

My youngest child has some amazing creative talents herself and has decided to join me this year in creating an ark worth of animals, only her's will be sculpted out of polymer clay (her preferred medium). We will be trying to keep up with each other (for the most part) and will do the same animals as the other individual. I have some grand ideas and hopes for this project as we progress throughout the year, including making the ark (knitted, of course, unlike the ark 'pattern' in Fiona Goble's book, which is made from cardboard). I hope you will join me on this journey of discovery and creativity.


Brown Bear
Mini Knitted Safari - Brown Bear
Needles: Size 2.5 (3.0 mm)
Yarn: Wool of the Andes - Brown Sugar

Possible typo on Row 21; I knit 8 sts instead of 11, to keep it in line with future increases.
Adjusted seam down front breast, cinching in 2-3 sts down entire length to front legs.
Extensive needle felting around the neck to create a neck.
Eyes and nose felted on in Wool of the Andes, black and chestnut respectively.
Tail, instead of running tail through remaining stitches, I folded the stitches in half along the cast on and sewed them together to create an oblong tail rather than circular.

1 Comment

    Tandy Imhoff

    Tandy has been designing knit and crochet projects since 2009. She recently started teaching as well. Here she will share her design process and finished projects by other designers.

    Archives

    June 2015
    December 2014

    Categories

    All
    Commission
    Crochet
    Knitting
    Noah
    Projects
    Review
    Technique

    RSS Feed

Powered by Create your own unique website with customizable templates.